Ingredient: Unsalted Butter

  • Pineapple Upside Down Cake

    Pineapple Upside Down Cake

    A perfect combination of caramel, pineapples and a soft moist vanilla cake. This invitingly luscious Pineapple Upside Down Cake serves a perfect desert when topped with a scoop of vanilla ice cream or may even make an ideal combo with tea or coffee.

    Here’s the recipe for this Luscious and Delectable Pineapple Upside Down Cake;


    Directions:

    • Mix together melted butter and brown sugar.
    • Spread evenly in a 9 inch round greased pan.
    • Arrange Pineapple slices evenly on top of the sugar mixture.
    • In a bowl, sift together all the dry ingredients (flour, baking powder, salt, and cinnamon powder).
    • In a separate bowl, whisk softened butter with sugar until light and fluffy.
    • Whisk eggs (one at a time).
    •  Add vanilla essence and mix well.
    • Add the mixed dry ingredients gradually in batches alternately with milk.
    • Mix well after each addition.
    • Pour the batter evenly in the prepared pineapple pan.
    • Preheat the oven to 175 degrees C (350 degrees F).
    • Bake for 45-50 mins or until an inserted toothpick comes out clean.
    • Let cool completely.
    • Run the tip of a knife around the edge of the knife.
    • Invert the cake onto a plate carefully.
    • Serve warm and Enjoy.
  • Chocolate Nutella Cookies

    Chocolate Nutella Cookies

    Indulge in the ultimate chocolate experience with these decadent Chocolate Nutella Cookies. Perfectly chewy and bursting with rich chocolate flavor, these cookies have a delightful surprise of gooey Nutella in every bite. Ideal for satisfying your sweet tooth or impressing guests, these cookies are a must-try for all chocolate lovers.

    These Chocolate Nutella Cookies are the perfect treat for any occasion, offering a delectable combination of chocolate and hazelnut in every bite. Enjoy them warm for an extra gooey center!

    Here’s the recipe for Crispy And Chewy Chocolate Nutella Cookies;


    Directions:

    • In a large mixing bowl, cream together the softened butter, granulated sugar, and brown sugar until light and fluffy. 
    • Add the eggs one at a time, beating well after each addition. 
    • Stir in the vanilla extract.
    • In a separate bowl, whisk together the flour, cocoa powder, baking soda, and salt. 
    • Gradually add the dry ingredients to the wet mixture, mixing until just combined. 
    • Fold in the chocolate chips.
    • Preheat your oven to 350°F (175°C). 
    • Line a baking sheet with parchment paper. 
    • Scoop out tablespoon-sized portions of dough and flatten them slightly. 
    • Place a teaspoon of chilled Nutella in the center of each portion. 
    • Enclose the Nutella with the dough and roll into a ball. 
    • Place the balls on the prepared baking sheet, spacing them about 2 inches apart.
    • Bake in the preheated oven for 10-12 minutes, or until the edges are set but the centers are still soft. 
    • Let the cookies cool on the baking sheet for 5 minutes before transferring to a wire rack to cool completely.
  • Tarte Tatin

    Tarte Tatin

    Tarte Tatin is a classic French dessert featuring caramelized apples baked under a buttery, flaky pastry crust. It’s traditionally served upside down, showcasing the beautifully caramelized fruit on top. This recipe provides a delightful mix of sweet, tart, and buttery flavors with a perfect balance of textures.

    This Tarte Tatin recipe captures the essence of this beloved French dessert, offering a delightful combination of caramelized apples and buttery pastry. 

    Here’s the recipe for Delightful and Caramelized Tarte Tatin;


    Directions:

    • Preheat your oven to 375°F (190°C).
    • In a large ovenproof skillet (preferably cast-iron), melt the butter over medium heat. 
    • Add the sugar and stir until it begins to dissolve and turns a light amber color, about 5-7 minutes.
    • Add the lemon juice and vanilla extract, then carefully arrange the apple halves in the skillet, cut side up. 
    • Cook for about 10 minutes, basting occasionally with the caramel, until the apples start to soften and caramelize. 
    • Remove from heat.
    • On a lightly floured surface, roll out the puff pastry to a size slightly larger than the skillet. 
    • Trim to a round shape if necessary.
    • Carefully place the puff pastry over the apples, tucking the edges down around the apples inside the skillet. 
    • Be cautious of the hot caramel.
    • Transfer the skillet to the preheated oven and bake for 25-30 minutes, or until the pastry is golden brown and puffed.
    • Remove the skillet from the oven and let it cool for about 5 minutes. 
    • Carefully run a knife around the edge to loosen the pastry. 
    • Place a serving plate upside down over the skillet, then quickly and carefully invert the skillet and plate together to turn the tart out onto the plate. 
    • Be cautious of hot caramel.
    • Allow the Tarte Tatin to cool slightly before serving. 
    • It can be enjoyed warm or at room temperature, often with a dollop of whipped cream or a scoop of vanilla ice cream.
  • Apple Upside Down Cake

    Apple Upside Down Cake

    A perfect combination of caramel, apples and a soft moist vanilla cake. This simple sweet tangy and moist autumn dessert serves a perfect dessert when topped with a scoop of vanilla ice cream or may even make an ideal combo with tea or coffee.

    This Apple Upside Down Cake recipe provides a unique, flavorful dessert that highlights the natural sweetness of apples, perfect for any occasion.

    Here’s the recipe for this Luscious and Delectable Apple Upside Down Cake;


    Directions:

    • Mix together melted butter and brown sugar.
    • Spread evenly in a 9 inch round greased pan.
    • Arrange Apple slices evenly on top of the sugar mixture.
    • In a bowl, sift together all the dry ingredients (flour, baking powder, salt, and cinnamon powder).
    • In a separate bowl, whisk softened butter with sugar until light and fluffy.
    • Whisk eggs (one at a time).
    •  Add vanilla essence and mix well.
    • Add the mixed dry ingredients gradually in batches alternately with milk.
    • Mix well after each addition.
    • Pour the batter evenly in the prepared apple pan.
    • Preheat the oven to 175 degrees C (350 degrees F).
    • Bake for 45-50 mins or until an inserted toothpick comes out clean.
    • Let cool completely.
    • Run the tip of a knife around the edge of the knife.
    • Invert the cake onto a plate carefully.
    • Serve warm and Enjoy.
  • Coconut Chocolate Chip Cookies

    Coconut Chocolate Chip Cookies

    Coconut Chocolate Chip Cookies are chewy and soft with shredded coconut and dark chocolate chips. These cookies freeze well, put the baked and cooled cookies in an airtight jar and place in the freezer. This way you can have a sweet treat anytime you want by popping them in the microwave for about a minute. These cookies keep their shape during the baking process and come out as nice domes. If you like the flatter cookies, you can also press them before baking with a water glass. Flat cookies will be a little more chewy and not quite soft. 

    Here’s the recipe for Yumilicious & Delightful Coconut Chocolate Chip Cookies;


    Directions:

    • Preheat the oven at 190 C.
    • Place a rack in the middle of the oven.
    • Line 2 baking sheets with parchment paper.
    • In a large bowl, beat together sugar and butter on medium speed until well combined. (30-60 sec)
    • In a mixing bowl, combine together flour, salt and baking powder.
    • Add eggs and vanilla in the sugar mixture and beat at medium speed until no clumps remain. (20-30 sec)
    • Add the flour mixture and beat on low speed just until almost all of the flour has been incorporated. (20-40 sec)
    • Add the shredded coconut and chocolate chips and beat on low speed until evenly incorporated.
    • If your dough feels very soft or warm at this point, chill the dough for 30-40 minutes before scooping or baking. This will help the cookies keep their domed shape better.
    • Use a large cookie scoop (about 4 tbsp) to scoop the dough out onto the baking sheet. 
    • Space the cookies about 1 & ½ inches apart. (leave as is for domed cookies or flatten slightly with the bottom of a water glass for flat cookies.)
    • Bake the cookies (1 sheet at a time) for about 15 minutes. 
    • Rotate the cookie sheet halfway through cooking so the cookies bake evenly.
    • While the first batch bakes, scoop the cookies for the next batch. 
    • The cookies are done when the bottoms are golden brown and the tops feel dry.
    • The cookies will be soft when first out of the oven, but will firm up as they cool.
    • Cool the cookies on the baking sheet for about 5 minutes. Then transfer on a wire rack to cool completely. Enjoy! 
  • Lemon Cookies

    Lemon Cookies

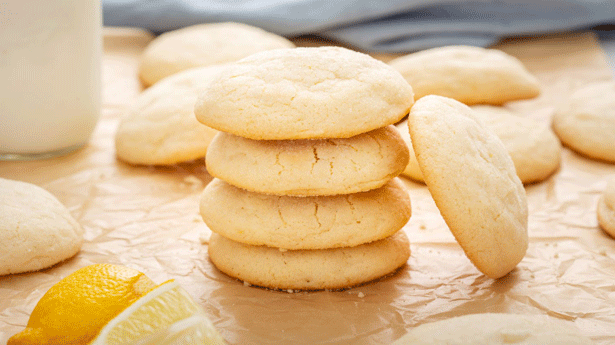
    These lemony, soft and chewy cookies are for lemon lovers only! They are made with a triple punch of lemon; Lemon juice, lemon zest and lemon extract. Perfect for when you need a little bit of sunshine. The secret ingredient for making these cookies soft and chewy is cream cheese. This also adds a subtle tang that works really well with the lemon flavor. Just make sure to let the cream cheese warm to room temperature before making the cookies otherwise it will never incorporate into the dough. 

    Because of the lemon juice, the dough will seem really sticky and hard to work with. Let the dough chill in the fridge for an hour  to help firm up the dough and make it easier to shape. If you find the dough still really sticky, you can also wet your palm before rolling them. Don’t worry if things get a little messy.  

    How to store and freeze?

    Store these cookies in an airtight jar on the counter for up-to 3 days.

    Freeze unbaked cookies: Roll the cookies into balls (but don’t roll in the sugar) Freeze them on a sheet pan in a single layer without touching, then transfer to a container once hard and freeze for up-to 3 months.

    Freeze baked cookies: Stack the cookies 3 or 4 high, wrap them in foil, and then transfer them to a freezer bag. Freeze for up-to a month. 


    Directions:

    • In a bowl, add butter, cream cheese, lemon zest, lemon extract, vanilla extract, both sugars and salt. 
    • Beat together until light, fluffy and clings to the side of the bowl.
    • Add the egg and beat to incorporate.
    • Add lemon juice and mix to incorporate. (The batter may look broken but don’t worry about that)
    • Add the flour and baking soda, mix until the dry ingredients are incorporated.
    • Cover the bowl and chill the dough in the fridge for at least 1 hour or overnight.
    • Preheat the oven to 190° C.
    • Line a baking sheet with parchment paper.
    • Use a cookie scoop or a tablespoon to scoop up a heaping tbsp dough.
    • Lightly roll the dough in the palms of your hands to form a ball.  (About the size of a ping-pong ball)
    • If the dough is too sticky , wet your hands, dry them slightly with a paper towel, and roll again with damp hands.
    • Roll the dough in the granulated sugar and place on the baking sheet. (Leaving about 2 inches between each balls)
    • Using a flat bottom of the glass, press down and form a thick disk. (If the dough starts sticking to the bottom of the glass, dip the glass in the sugar before continuing)
    • Sprinkle some extra sugar over each cookie.
    • Bake them for 12-15 minutes or until the edges of the cookies are starting to turn golden brown.
    • Let cool for 10 minutes on the baking sheet, then transfer them to a wire rack to cool completely.
    • Enjoy with a glass of milk or a mug of coffee. 
  • Buffalo Wings

    Buffalo Wings

    Buffalo wings are a beloved American classic known for their spicy, tangy flavor and crispy texture. These unbreaded chicken wing sections, typically consisting of flats and drumettes, are deep-fried to achieve a golden, crunchy exterior. Once fried, the wings are generously coated or dipped in a signature Buffalo sauce, which is a blend of hot sauce, melted butter, and sometimes a hint of vinegar for extra tanginess. This sauce imparts the wings with their characteristic heat and savory taste.

    Traditionally, Buffalo wings are served with celery sticks and a side of blue cheese dressing, which provides a cooling contrast to the spiciness of the wings. Perfect for game days or gatherings, these wings are sure to please a crowd.

    Here’s the recipe to enjoy your Delicious Homemade Buffalo wings!


    Directions:

    • Cut the chicken wings into drumettes and wingettes, discarding the tips. 
    • Pat them dry with paper towels.
    • In a large bowl, mix the flour, paprika, garlic powder, salt, and black pepper. 
    • Toss the wings in the flour mixture until evenly coated.
    • Heat oil in a deep fryer or large pot to 375°F (190°C). 
    • Fry the wings in batches for about 10-12 minutes or until golden brown and crispy. 
    • Drain on paper towels.
    • In a small saucepan, combine the hot sauce, melted butter, vinegar, and Worcestershire sauce. 
    • Heat over medium until well combined.
    • Place the fried wings in a large bowl, pour the sauce over them, and toss to coat. 
    • Serve immediately with celery sticks and blue cheese dressing.
  • Chocolate Chip Cookies

    Chocolate Chip Cookies

    This chocolate chip cookie recipe makes cookies that are irresistible on the day they are made. The edges are buttery and crispy, the middles are soft and chewy, and the chocolate chips are perfectly semi-melted. One special ingredient helps deepen the flavor and gives the chocolate chip cookies a chewier texture, and the secret ingredient in this chocolate chip cookie recipe is Milk Powder! I prefer an equal amount of brown sugar and white sugar and slightly more flour, this gives the cookies a sturdier structure and satisfying to eat. I also highly recommend giving the batter at least 45 minutes in the refrigerator before scooping and baking them. Bake these cookies until you see that the tops are fully puffed and the edges are starting to look toasty, then let them cool for a minute on the baking sheet before transferring them to a cooling rack. As they cool, the puffy dome will collapse on top, giving the chocolate chip cookies their signature crinkled, craggy appearance. They lose some of their crispness overnight, becoming softer. But they are no less delicious and satisfy your cookie craving. 

    Here’s the recipe for Yummilicious and Most Delicious Chocolate Chip Cookies;


    Directions

    • In a bowl, add softened butter, brown and white sugar, and beat on medium speed until combined. (30-60 sec)
    • In another bowl, sift together the remaining dry ingredients and combine.
    • Add eggs and vanilla extract to the sugar and butter mixture, and beat on medium speed until no clumps remain. (10-20 sec)
    • Add the flour mixture into the sugar and butter mixture, and beat on low speed just until no more dry streaks of flour are visible, 20-40 seconds. (You may still see some flecks of milk powder, this is fine)
    • Add chocolate chips and fold with a spatula until chips are evenly incorporated. 
    • Cover the mixture and refrigerate for at least 45 minutes or up to 3 days. (Or freeze in individual scoops for up to 3 months)
    • Preheat the oven to 190° C.
    • Use a medium cookie scoop or a tablespoon to scoop the dough out onto one of the baking sheets. (Space the cookies about 2 inches apart)
    • Bake the cookies for 10-12 minutes.
    • The cookies are done when they look slightly puffed in the middle and are starting to turn toasty at the edges.
    • Cool the cookies on the baking sheet for about 5 minutes or until the puffs collapse down.
    • Transfer the cookies to a wire rack to cool completely. Enjoy!


    They keep for about a week before becoming crumbly. At this point, I recommend crushing them over ice cream and enjoy!

  • Chinese Almond Cookies

    Chinese Almond Cookies

    Chinese Almond Cookies are a trademark in Chinese-American cooking. They have a crispy bite and delightfully sandy texture. Almond flour, almond extract, and slivered almonds ensure that you get an intense flavor that will eclipse any paper-filled treat. 

    Here’s the recipe for these delectable and delightful Chinese Almond Cookies;


    Directions

    • In a bowl, add almond flour, salt, and butter and beat on medium speed for 3 minutes. (The mixture will become coarse and chunky looking)
    • Add one of the eggs, reserving the other for later, and the almond extract. 
    • Mix on low speed until just incorporated.
    • Sift together the flour, sugar, and baking soda then add to the butter mixture at low speed. 
    • Mix until just combined.
    • Take the dough and wrap it in plastic wrap.
    • Place the dough in the refrigerator for two hours to chill.
    • Preheat the oven to 160° C.
    • Line a baking sheet with parchment paper.
    • Place the other egg into a bowl and beat it.
    • Take pieces of dough, and roll them into balls about three-quarters of an inch wide. 
    • Place them on the baking sheet about an inch apart.
    • Press them down slightly with your palm to make a coin shape.
    • Place a slivered almond onto each cookie and lightly press it into place.
    • Then, brush the surface of the cookie with the beaten egg.
    • Bake at 160° C for 13-15 minutes or until the edges begin to tan.
    • Let cool for 2-3 minutes on the baking sheet, then transfer them to a wire rack to cool completely. Enjoy!
  • Peanut Butter Cookies

    Peanut Butter Cookies

    These Peanut Butter Cookies are a delightful treat that combines the rich flavor of peanut butter with the perfect sweetness. They are soft, chewy, and effortless made with just a few simple ingredients. Whether you’re a peanut butter enthusiast or simply looking for a delicious cookie recipe, these Peanut Butter Cookies are perfect for sharing with friends and family or enjoying as a special treat for yourself. They store well in an airtight container for several days, although they are often enjoyed fresh out of the oven for that irresistible warm and gooey texture.

    Here’s the recipe for Chewy and Delicious Peanut Butter Cookies;


    Directions

    • In a bowl, add butter and beat until fluffy.
    • Add brown and white sugar in butter and beat for 2 minutes.
    • Add peanut butter and egg and mix.
    • In a bowl, sift together the dry ingredients.
    • Stir dry ingredients into the sugar and butter mixture to form a dough.
    • Wrap dough in plastic and refrigerate it for at least 4 hours.
    • Preheat the oven to 190° C.
    • Shape the dough into balls. Place the balls about 3 inches apart on an ungreased cookie sheet.
    • Flatten in a criss-cross pattern with a fork. (Dip the fork in powdered sugar to keep it from sticking to the dough)
    • Bake the cookies at 190° C until light brown for about 10 minutes.
    • Remove the cookies from the oven and let them cool on their baking sheet for a minute.
    • After a minute, transfer the cookies to a rack to cool completely.
    • Serve with tea or coffee and enjoy.